encaustic painting

Come out for my solo show of encaustic paintings!

My Perspective on Windows and Doors. A Solo Exhibition of Paintings by Marion Meyers

Colborne Art Gallery, Ontario

June 9, 2018 through July 22, 2018

Opening Reception: Saturday June 9, 2018, 2 to 4 pm

Bodega Kitchen encaustic on birch panel 12″ x 36″
Musee d’Orsay Window on the Seine encaustic on birch panel 12” x 36”

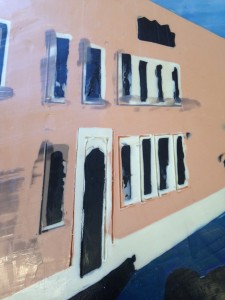
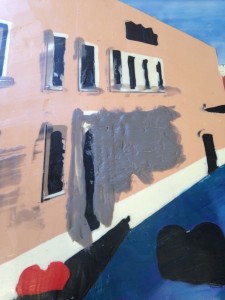
Windows and doors: they seem to tell me, “You’re welcome here.”, or “No one cares.” Would I like to open that door? Bang on that knocker? Reflect on what goes on behind that window? I imagine being on the other side, looking out that window or just admiring how the light streams in. I find odd angles intriguing and often work the architectural patterns of windows and doors into abstract work.

For years I had a recurring dream of a giant old warehouse building filled inside with what appeared to be a giant “Mousetrap” game. And I rode around in a small cart, like I was on a single-person roller coaster, going in and out of doors in walls and windows in the frame of the warehouse, bumping into things and setting off chain reactions of cogs and wheels turning. It was a gritty, grimy place of clanging metal and old wood. Years later we played a video game called Riven, where finding the right door or knob to turn would open a passageway, leading you to the next window or hole in the wall to climb through. It was dark inside with light streaming in where you might find a way out or back into the game again. Just like in my dream.

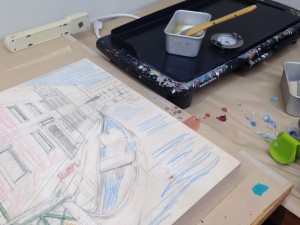
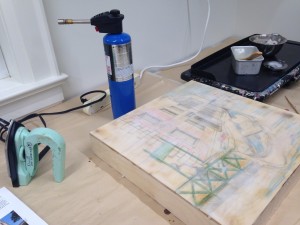
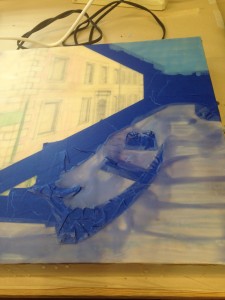
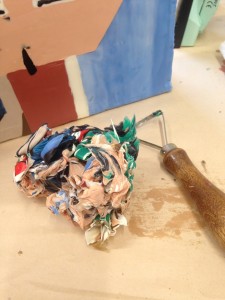
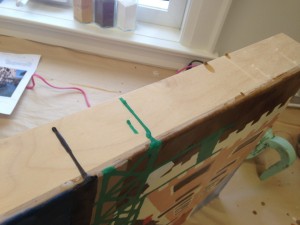
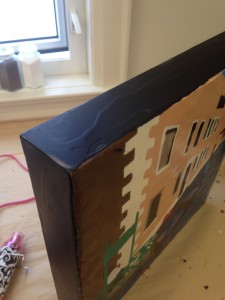
There are always strong lines in images of windows and doors and often repeating patterns, gorgeous colours and texture. These images come out in the texture and piecing of quilted wall hangings. The images swirling in my head, either from photos I’ve taken or abstract impressions of places, are ideas I bring out in my encaustic paintings. Encaustic medium is an ancient process of melting beeswax and damar resin together with pigment to paint, hot and fluid, on birch panels. It dries immediately and each layer of encaustic paint must be fused with a blow torch, heat gun or hot iron to the layer beneath. Encaustic paint is a wonderful medium for scraping away, layering colour, adding texture and making glossy surfaces, all key elements of My Perspective on Windows and Doors.

The Colborne Art Gallery

51 King Street East, Colborne, Ontario

905-355-1798

Gallery Hours During Shows: Thursday to Sunday 12 to 4 pm

How I Create Urban Landscapes in Encaustic

Canali di Venezia, encasutic on birch panel, 16" x 16", Marion Meyers, 2016
Canali di Venezia, encaustic on birch panel, 16″ x 16″, Marion Meyers, 2016 –

I’ve always loved to paint urban and rural landscapes and in oil painting landscapes are a common subject. However, when I started to paint in encaustic medium I discovered that it’s hard to get those clean edges that you need for the lines, perspectives and boundaries between colours when painting buildings. So I had to create a way to do this with the techniques I’d learned.


Venice: pencil perspective
I was working from a photograph in a 2:3 size ratio and my substrate of a birch panel was square (16″ by 16″) I couldn’t just chop off a bit of the image on each side; I’d lose my gondola guy on the left and the other side of the canal on the right, so I played around and changed the perspective. I do my drawing in pencil onto the birch panel.


Venice: filling in the drawing
I use a ruler and mark my horizon line. Then I add in the detail I think I’ll need for the blocking off of various areas of the painting.


Venice: adding pencil crayon colour
I used coloured pencils in some areas just to help my eyes sort out the image areas because they’d get a but fuzzy as I layered on the base of encaustic medium.
Venice; first layer of wax
I melt the encaustic medium on my griddle. Then I heat up the wood with my heat gun to make it more receptive to the first layers of medium. The medium goes on fluid and hot with a soft, fine large brush. After each layer goes on, I fuse it. For this stage I like using the blow torch to fuse.


Venice: layers of medium
For this base of medium, I give the board a quarter turn with each layer, fusing as I go. When I get to the very last layer of medium I also use my encaustic iron to smooth it all out. You can still see my drawing through these four layers of medium. This is one of my favourite parts of the process. The painting must be set aside for the day at this point to harden well.


Venice: masking off background
The next day I use painters tape to create an edge for the area of the painting that I want to paint first. Here I’ve taped the edge of the buildings and the gondola next to the sky in the background and the water of the canal in the foreground.


Venice: the first layers of colour
So here’s one layer of colour for the sky and one for the water. I’ll fuse between each layer, building up wax for about 6 or 8 layers of colour. I need this many, as I will be scraping some away and carving into some parts.
Venice: mixing paint
I’ve got some paint melting on my griddle. I’ll explain how I mix the colours some other time! I’m going for various shades of blue for the sky and water. These first colour layers are fairly solid in colour as I can add colour farther along in the process.


Venice: fusing with a heat gun
I fuse using the heat gun as I find this is the easiest tool for controlling the heat in very small areas.


Venice: multiple layers
And here it is built up with many layers and various hues.
Venice: peeling the mask off
Now I’ll peel away the tape, pulling away at the sharp angle to keep the edge clean. The wax needs to be a bit soft to do this, so you can’t build up areas of wax and walk away for an hour and expect to be able to come back and peel it up. It will be very hard.


Venice: keeping it organized - Using my print out of the photo, I work out a plan for what order to work. I need each area to harder for a day before adding a colour right next to it. This helps to prevent colours from bleeding into each other.
Using my print out of the photo, I work out a plan for what order to work. I need each area to harden for a day before adding a colour right next to it. This helps to prevent colours from bleeding into each other.
Venice: working the plan - So following the plan of what to do next, I'll mix more colour and medium and mask off areas that are next to where I am filling in the painting. Because I have to fuse each of the six or eight layers, I need to protect what's already there and keep paint away from where another colour is going.
So following the plan of what to do next, I’ll mix more colour and medium and mask off areas that are next to where I am filling in the painting. Because I have to fuse each of the six or eight layers, I need to protect what’s already there and keep paint away from where another colour is going.
Venice: building up the smaller background areas may be a good idea at this stage so I've done the window frames and fence = very fussy! For those little wee fence strips I use an razor blade to cut strips in my tape, and I use a couple of layers of tape to make it stronger. I'll do all the verticals first, then horizontals and then the ones on the diagonal - yikes - it helps for when you peel it all up.
Building up the smaller background areas may be a good idea at this stage so I’ve done the window frames and fence = very fussy! For those little wee fence strips I use an razor blade to cut strips in my tape, and I use a couple of layers of tape to make it stronger. I’ll do all the verticals first, then horizontals and then the ones on the diagonal – yikes – it helps for when you peel it all up.
Venice: masking off is tricky work - you can see that you need to be precise and why I did the drawing underneath it all.
Masking off is tricky work – you can see that you need to be precise and why I did the drawing underneath it all.
Venice: 8 layers of wax with colour - you can see that I've done doors, windows, the side wall, the building in the distance and part of the dock, leaving that middle ground for the end.
8 layers of wax with colour – you can see that I’ve done doors, windows, the side wall, the building in the distance and part of the dock, leaving that middle ground for the end.


Venice: warming the base
When I start painting in an new area, it needs a bit of warming up with the heat gun.
Venice: filling large areas - I often fill in window areas first and then fill in around them another day. These windows and doors were masked off first and then I start to paint in the stone facade.
I often fill in window areas first and then fill in around them another day. These windows and doors were masked off first and then I start to paint in the stone facade.


Venice: the colour blocks are done and you can see that the surface looks bumpy with some edges higher than others.
The colour blocks are done and you can see that the surface looks bumpy with some edges higher than others.
Venice: I heat up areas of the painting of about 4" by 4" and very carefully scrape up those bumps and rough edges, revealing the sharp clean lines of the original image.
I heat up areas of the painting of about 4″ by 4″ and very carefully scrape up those bumps and rough edges, revealing the sharp clean lines of the original image.
Venice: after scraping the surface level away I'm left with a fairly flat and even surface. This is physically hard to do and I must be careful not to gouge any holes. It takes a long time to get the whole surface done. The painting isn't attractive at this stage and it's hard to keep motivated.
After scraping the surface level away I’m left with a fairly flat and even surface. This is physically hard to do and I must be careful not to gouge any holes. It takes a long time to get the whole surface done. The painting isn’t attractive at this stage and it’s hard to keep motivated.
Venice: cleaning up the sides - this is the best time to scrap away drips on the sides and use a hot iron to melt away wee bits.
This is the best time to scrap away drips on the sides and use a hot iron to melt away wee bits.


Venice: These lovely panels have deep sides and I could leave them blank so you see the natural birch. I choose to paint these black as I think it gives nice profile to the painting. These panels aren't meant to be framed. I build up the wax on the sides using an ugly mix of all those scraped up bits and do the final couple of areas in pure black.
These lovely panels have deep sides and I could leave them blank so you see the natural birch. I choose to paint these black as I think it gives nice profile to the painting. These panels aren’t meant to be framed. I build up the wax on the sides using an ugly mix of all those scraped up bits and do the final couple of areas in pure black.
Venice: Now I can add some detail. I use metal dental and pottery tools to carve out fine lines for window sills, water pipes, shadows, mortar lines and so on.
Now I can add some detail. I use metal dental and pottery tools to carve out fine lines for window sills, water pipes, shadows, mortar lines and so on.
Venice: The next step is filling the carved bits, pocking the wax into those gouged out lines.
The next step is filling the carved bits, pocking the wax into those gouged out lines.


Venice: Now I'm carefully scraping away the paint on top to reveal those fine lines before fusing.
Now I’m carefully scraping away the paint on top to reveal those fine lines before fusing.
Venice: Now I add fine detail with brass tools. I can attach a variety of nibs onto this heat tool. This one acts like a pen, wicking up paint from solid bars of paint. I can draw on those shadows, window grills, balconies, fence posts, waves in the water. This tool fuses the paint on so that I don't have to fuse - but I can if I want! I also have little brass "paint brush" and it's good for those larger shaded areas or individual brinks.
I add fine detail with brass tools. I can attach a variety of nibs onto this heat tool. This one acts like a pen, wicking up paint from solid bars of paint. I can draw on those shadows, window grills, balconies, fence posts, waves in the water. This tool fuses the paint on so that I don’t have to fuse – but I can if I want! I also have little brass “paint brush” and it’s good for those larger shaded areas or individual brinks.
Venice: almost finished - I use the tips of brushes to paint on waves and other bits. I also use paint sticks to add texture, shadow and colour to various areas. I'll have to write more about that another time!
Almost finished – I use the tips of brushes to paint on waves and other bits. I also use paint sticks to add texture, shadow and colour to various areas. I’ll have to write more about that another time!